This guide is part of the Kubernetes Guide — a complete topic cluster covering Kubernetes concepts, operations, and production debugging.
Introduction
Every time you create a pod in Kubernetes, something has to decide where it runs. That decision belongs to the kube-scheduler — one of the core control plane components responsible for watching for unscheduled pods and assigning each one to the most suitable node.
Most engineers interact with the scheduler indirectly. You write a Deployment manifest, apply it, and pods appear on nodes. The scheduler’s work is invisible when things go right. It only becomes visible when things go wrong — when pods stay Pending with no explanation, when replicas cluster onto the same node instead of spreading across zones, or when a traffic spike cannot scale because every node is full and the autoscaler is too slow.
Understanding how the scheduler works, what constraints influence its decisions, and how to communicate your placement requirements clearly through pod specs separates engineers who debug scheduling failures in minutes from those who spend hours guessing.
This guide covers the complete scheduling pipeline: how pods move from Pending to Running, the filter and score phases, node selectors, affinity and anti-affinity rules, taints and tolerations, topology spread constraints, and the production patterns that keep workloads reliable across nodes and zones.
1. The Scheduler’s Role in the Cluster
The scheduler is a control plane component that does exactly one thing: watches for pods with no nodeName assigned and selects the best node for each one.

DIAGRAM: This diagram shows the end-to-end scheduling flow—from Deployment creation to Pod execution—highlighting how the scheduler detects unscheduled Pods, evaluates nodes, and assigns the best-fit node before the kubelet starts the container.
The scheduler never starts containers itself. It only makes the placement decision and writes it to the API server. The actual container lifecycle is the kubelet’s responsibility.
2. The Two-Phase Scheduling Algorithm
The scheduler evaluates every unscheduled pod against every available node in two phases: Filtering and Scoring.
All Nodes in Cluster (5 nodes)
         │
         ▼
┌─────────────────────────────┐
│        FILTER PHASE         │
│  Remove nodes that cannot   │
│  run this pod               │
│                             │
│  ✗ Node 1 — Insufficient CPU│
│  ✗ Node 2 — Taint mismatch  │
│  ✓ Node 3 — passes all      │
│  ✓ Node 4 — passes all      │
│  ✗ Node 5 — Wrong zone      │
└──────────────┬──────────────┘
               │  2 candidate nodes remain
               ▼
┌─────────────────────────────┐
│         SCORE PHASE         │
│  Rank remaining nodes       │
│                             │
│  Node 3 — score: 72         │
│  Node 4 — score: 89  ← wins │
└──────────────┬──────────────┘
               │
               ▼
        Pod assigned to Node 4
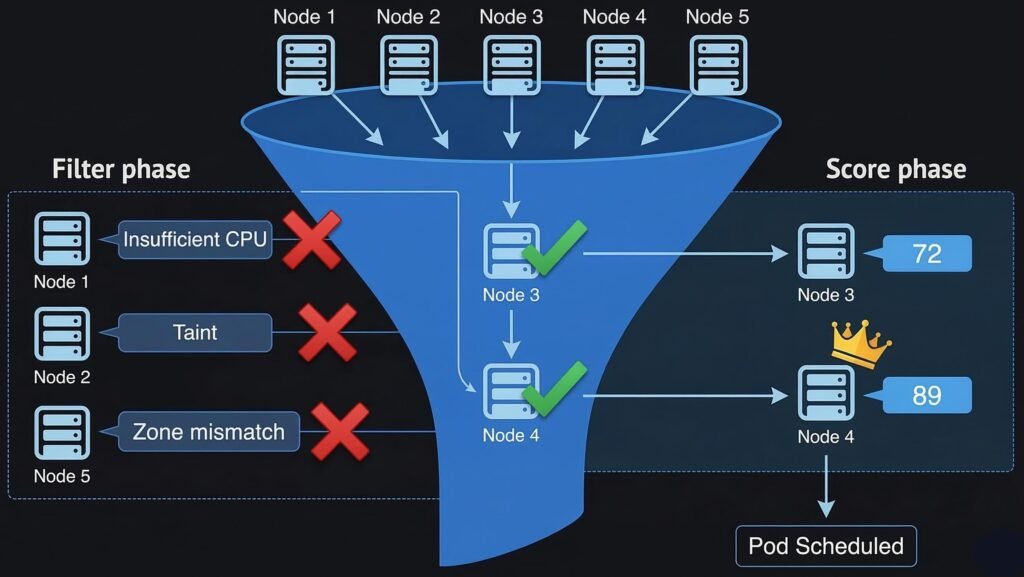
DIAGRAM: This diagram illustrates the scheduler’s two-phase decision process. During the Filter phase, nodes that cannot run the Pod are removed based on resource constraints, taints, or topology rules. The remaining candidate nodes then enter the Score phase, where each node is ranked according to scheduling policies. The node with the highest score is selected for the Pod.
Filter Phase — Predicate Checks
The filter phase removes any node that cannot run the pod. A single failed check eliminates the node entirely. Common filter predicates:
| Filter | What it checks |
|---|---|
| NodeResourcesFit | Node has enough CPU and memory for pod requests |
| NodeAffinity | Node labels match pod’s nodeAffinity rules |
| TaintToleration | Pod tolerates all NoSchedule taints on the node |
| PodTopologySpread | Placing pod here would not violate spread constraints |
| VolumeBinding | Required PVC can be bound on this node (for zone-local disks) |
| NodeUnschedulable | Node is not cordoned |
| PodAffinity | Node satisfies pod affinity / anti-affinity rules |
If zero nodes pass all filters, the pod stays Pending. The scheduler records the reason in the pod’s events — this is the message you read with kubectl describe pod.
Score Phase — Priority Functions
After filtering, the remaining nodes are scored. Each scoring function assigns points for different desirable properties. The scores are weighted and summed. Common scoring functions:
| Scoring Function | What it rewards |
|---|---|
| LeastAllocated | Nodes with more free CPU and memory (spreads load) |
| BalancedAllocation | Balanced CPU vs memory usage ratio |
| NodeAffinity | Nodes that match preferred (not required) affinity rules |
| PodTopologySpread | Placement that balances pods across zones/nodes |
| ImageLocality | Nodes that already have the container image cached |
3. Node Selectors and Node Affinity
Node selectors and node affinity are how you constrain which nodes a pod can run on, based on node labels.
Node Selector — Simple Label Matching
The simplest form. A pod with a nodeSelector only schedules on nodes that have all the specified labels.
spec:
  nodeSelector:
    node-type: high-memory          # only schedule on nodes with this label
    topology.kubernetes.io/zone: eastus-1
# Label a node
kubectl label node aks-nodepool-003 node-type=high-memory

# Check node labels
kubectl get nodes --show-labels
Node selector is a hard requirement — if no node has the label, the pod stays Pending. There is no fallback.
Node Affinity — Flexible Rules
Node affinity is the more powerful successor to node selector. It supports two rule types:
requiredDuringSchedulingIgnoredDuringExecution — hard requirement. Pod will not schedule if no node satisfies this rule. Equivalent to node selector but with richer expression syntax.
preferredDuringSchedulingIgnoredDuringExecution — soft preference. Scheduler tries to satisfy this but will place the pod elsewhere if no matching node exists.

DIAGRAM: Hard vs Soft Node Affinity in Kubernetes — Required affinity strictly enforces placement and can leave Pods Pending if no nodes match, while preferred affinity prioritizes matching nodes but allows fallback scheduling.
spec:
  affinity:
    nodeAffinity:
      # Hard rule — pod will not schedule without this
      requiredDuringSchedulingIgnoredDuringExecution:
        nodeSelectorTerms:
        - matchExpressions:
          - key: topology.kubernetes.io/zone
            operator: In
            values:
            - eastus-1
            - eastus-2

      # Soft preference — scheduler prefers but does not require
      preferredDuringSchedulingIgnoredDuringExecution:
      - weight: 80
        preference:
          matchExpressions:
          - key: node-type
            operator: In
            values:
            - high-memory
      - weight: 20
        preference:
          matchExpressions:
          - key: node-type
            operator: In
            values:
            - standard
The weight field (1–100) influences how strongly the scheduler prefers matching nodes relative to other scoring factors. Higher weight = stronger preference.
4. Taints and Tolerations
Taints are applied to nodes to repel pods. Tolerations are applied to pods to allow them to be scheduled on tainted nodes.
Think of it as a lock-and-key system: a taint on a node is a lock, a toleration on a pod is the key that opens it.
Node (tainted):   dedicated=gpu:NoSchedule
                       │
                       │  Pod without toleration → BLOCKED
                       │  Pod with matching toleration → ALLOWED
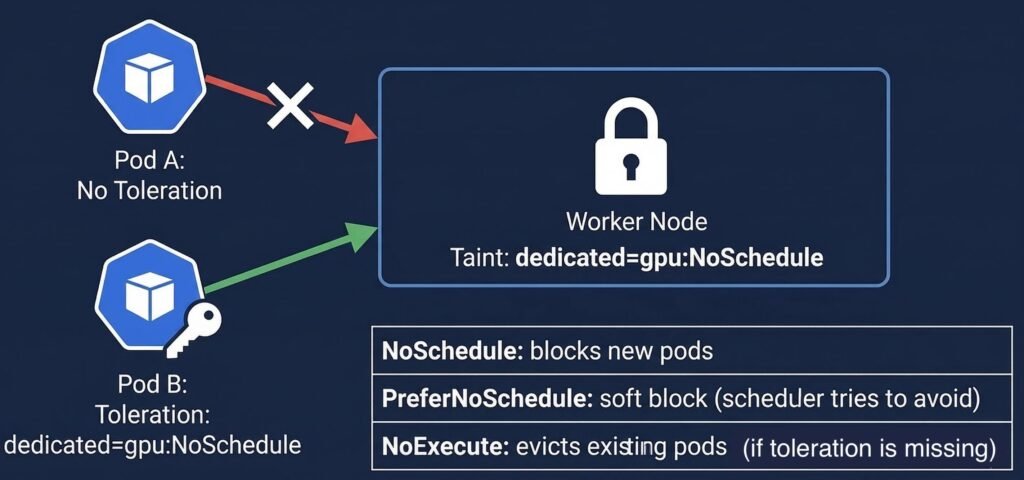
DIAGRAM: This diagram illustrates how taints on a node control Pod scheduling. Pods without a matching toleration are blocked (NoSchedule) from the node, while Pods with the correct toleration are allowed to schedule. The table below summarizes taint effects: NoSchedule blocks new Pods, PreferNoSchedule is a soft preference, and NoExecute evicts existing Pods.
Taint Effects
| Effect | New Pods | Existing Pods |
|---|---|---|
| NoSchedule | Will not be scheduled on tainted node | Not affected |
| PreferNoSchedule | Scheduler avoids tainted node if possible | Not affected |
| NoExecute | Will not be scheduled | Evicted if they do not tolerate the taint |
# Add a taint to a node
kubectl taint nodes aks-gpu-001 dedicated=gpu:NoSchedule

# Remove a taint (append - to remove)
kubectl taint nodes aks-gpu-001 dedicated=gpu:NoSchedule-

# Check taints on all nodes
kubectl get nodes -o custom-columns=NAME:.metadata.name,TAINTS:.spec.taints
# Pod toleration to schedule on the GPU node
spec:
  tolerations:
  - key: "dedicated"
    operator: "Equal"
    value: "gpu"
    effect: "NoSchedule"

  # Tolerate any taint with key 'dedicated' regardless of value
  - key: "dedicated"
    operator: "Exists"
    effect: "NoSchedule"
Common Production Taint Patterns
System node pool isolation — taint system nodes to prevent application pods from running on them:
kubectl taint nodes <system-node> CriticalAddonsOnly=true:NoSchedule
Spot/preemptible node pools — taint spot nodes so only workloads that explicitly tolerate interruption run there:
# AKS spot node taint (applied automatically)
kubernetes.azure.com/scalesetpriority=spot:NoSchedule
# Add this toleration to workloads safe to run on spot nodes
tolerations:
- key: "kubernetes.azure.com/scalesetpriority"
  operator: "Equal"
  value: "spot"
  effect: "NoSchedule"
5. Pod Affinity and Anti-Affinity
While node affinity controls which nodes a pod can run on, pod affinity and anti-affinity control which other pods a pod should run near or away from.
Pod affinity — schedule this pod on a node that is running pods matching a label selector. Useful for co-locating components that communicate heavily (reduces network latency).
Pod anti-affinity — schedule this pod on a node that is NOT running pods matching a label selector. Used to spread replicas across nodes or zones for high availability.
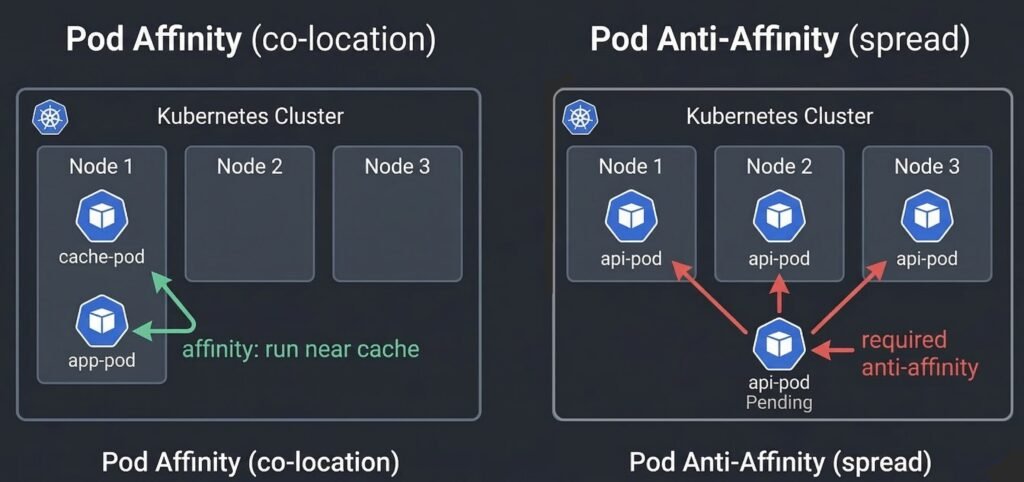
DIAGRAM: This diagram compares Pod affinity and anti-affinity scheduling rules. On the left, Pod Affinity ensures Pods are co-located with related Pods (e.g., app-pod scheduled near cache-pod). On the right, Pod Anti-Affinity spreads Pods across nodes to avoid collisions, blocking scheduling when no node meets the required constraints. Green arrows indicate attraction, red arrows indicate repulsion.
spec:
  affinity:
    # Co-locate with cache pods (affinity)
    podAffinity:
      preferredDuringSchedulingIgnoredDuringExecution:
      - weight: 100
        podAffinityTerm:
          labelSelector:
            matchLabels:
              app: redis-cache
          topologyKey: kubernetes.io/hostname

    # Spread replicas across nodes (anti-affinity)
    podAntiAffinity:
      # Hard rule: never two replicas on same node
      requiredDuringSchedulingIgnoredDuringExecution:
      - labelSelector:
          matchLabels:
            app: api-service
        topologyKey: kubernetes.io/hostname

      # Soft preference: prefer different zones
      preferredDuringSchedulingIgnoredDuringExecution:
      - weight: 100
        podAffinityTerm:
          labelSelector:
            matchLabels:
              app: api-service
          topologyKey: topology.kubernetes.io/zone
Production warning: Required pod anti-affinity with
topologyKey: kubernetes.io/hostnamecreates a hard ceiling: maximum one replica per node. If you try to scale to more replicas than you have nodes, the extra pods are permanently Pending. Usepreferredanti-affinity unless you have an absolute correctness requirement.
6. Topology Spread Constraints
Topology spread constraints are the modern, cleaner way to control how pods are distributed across topology domains like zones and nodes. They replace complex anti-affinity rules for the common case of wanting balanced distribution.
spec:
  topologySpreadConstraints:
  - maxSkew: 1                          # max difference in pod count between domains
    topologyKey: topology.kubernetes.io/zone    # spread across zones
    whenUnsatisfiable: DoNotSchedule    # hard: block scheduling if constraint violated
    labelSelector:
      matchLabels:
        app: api-service

  - maxSkew: 2
    topologyKey: kubernetes.io/hostname  # also spread across nodes within zones
    whenUnsatisfiable: ScheduleAnyway    # soft: schedule anyway but try to satisfy
    labelSelector:
      matchLabels:
        app: api-service
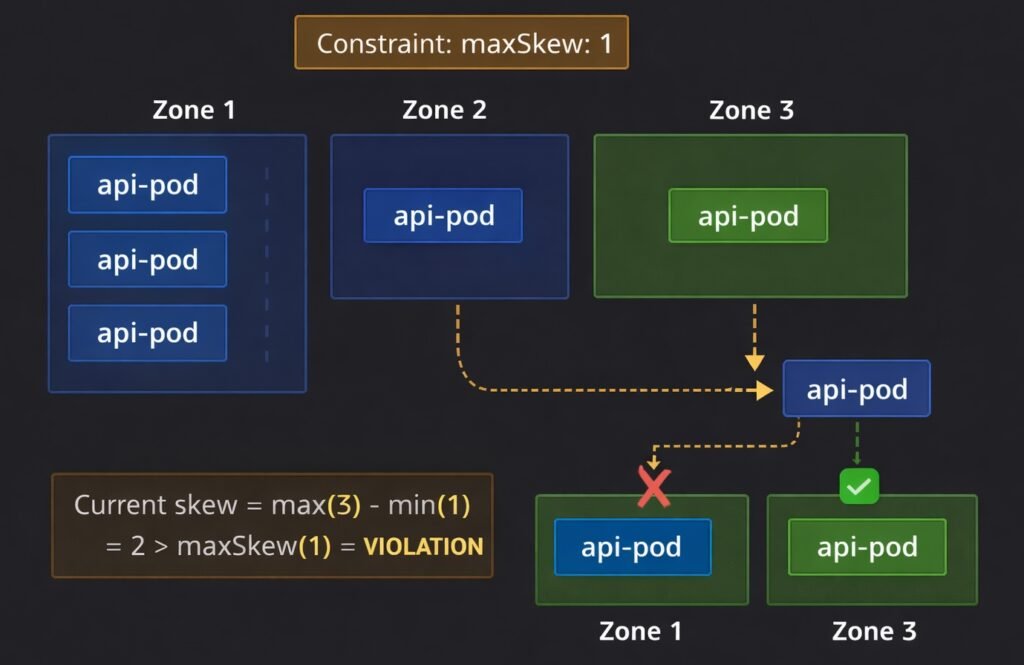
DIAGRAM: This diagram illustrates topology spread constraints across three zones. The maxSkew: 1 rule limits how unevenly Pods can be distributed. Zone 1 has 3 Pods, Zones 2 and 3 have 1 Pod each, creating a violation (skew = 2 > maxSkew). A new Pod can only schedule in Zone 2 or 3 (green), while Zone 1 is blocked (red X). Orange highlights the violation.
maxSkew defines the maximum allowed difference in pod count between the most-loaded and least-loaded topology domain. maxSkew: 1 means no zone can have more than 1 extra pod compared to any other zone.
whenUnsatisfiable controls behavior when the constraint cannot be satisfied:
DoNotSchedule— pod stays Pending until the constraint can be satisfied (hard)ScheduleAnyway— pod schedules on the best available domain but tries to minimize skew (soft)
7. Priority Classes and Preemption
When a cluster is full and a new high-priority pod needs to schedule, the scheduler can preempt (evict) lower-priority pods to make room.
# Define a priority class
apiVersion: scheduling.k8s.io/v1
kind: PriorityClass
metadata:
  name: production-critical
value: 1000000
globalDefault: false
description: "Production critical workloads — preempts best-effort pods"

---
# Assign it to a pod
spec:
  priorityClassName: production-critical
Priority values:
  system-cluster-critical   2000000000  (kube-system components)
  system-node-critical      2000001000  (kubelet, CNI)
  production-critical       1000000     (your critical apps)
  default                   0           (unlabeled pods)
  low-priority-buffer       -10         (capacity buffer pods)
Preemption flow: A high-priority pod is Pending because no node has enough capacity. The scheduler identifies a node where evicting lower-priority pods would free enough resources. It evicts those pods (they are rescheduled elsewhere) and places the high-priority pod.
Production use: Always assign PriorityClasses to production workloads. Without them, a batch job or development deployment can consume all cluster capacity and prevent critical production pods from scheduling during an incident.
8. Real Production Example — Anti-Affinity Blocking Scale-Out
Scenario: A pharmaceutical client’s order processing service has 3 replicas running with required pod anti-affinity — one replica per node, for high availability. During a compliance audit period, traffic doubles. The deployment is scaled from 3 to 8 replicas. Five pods stay Pending indefinitely.
kubectl describe pod order-svc-7d9f-xp2k4 -n pharma-prod
# Events:
# Warning FailedScheduling
# 0/3 nodes are available:
# 3 node(s) didn't match pod anti-affinity rules.
The cluster has 3 nodes. The required anti-affinity rule means maximum one replica per node — a hard ceiling of 3 replicas total. Scaling to 8 was never going to work with the existing rule.
# Check the anti-affinity rule
kubectl get deployment order-svc -o yaml | grep -A10 podAntiAffinity
# requiredDuringSchedulingIgnoredDuringExecution
# topologyKey: kubernetes.io/hostname

# Fix: change required to preferred
kubectl edit deployment order-svc -n pharma-prod
# Change: requiredDuringSchedulingIgnoredDuringExecution
# To:     preferredDuringSchedulingIgnoredDuringExecution

# Pods immediately begin scheduling
kubectl get pods -n pharma-prod -w
# All 8 replicas Running within 90 seconds
Time to resolution: 7 minutes. Lesson: required anti-affinity sets a hard replica ceiling equal to the number of matching nodes. For high availability spreading, preferred anti-affinity with topology spread constraints achieves the goal without blocking horizontal scaling.
9. When Things Go Wrong
Pod is Pending with no scheduling events at all — the scheduler itself may be down. Check kubectl get pods -n kube-system | grep scheduler. See: Debugging Kubernetes Control Plane Failures
Pod is Pending with FailedScheduling events — read the full event message. It tells you exactly which filter eliminated which nodes. See: Debugging Kubernetes Scheduling Problems
Pods all clustering on the same node — topology spread constraints or anti-affinity not configured. Add topologySpreadConstraints to distribute replicas across zones. See: Debugging Kubernetes Scheduling Problems
HPA scaled up but pods stay Pending — cluster has no capacity. Check kubectl describe nodes | grep -A6 "Allocated resources". Either add nodes or reduce resource requests. See: Debugging Kubernetes Scheduling Problems
Spot node pods keep getting evicted — spot nodes are being reclaimed by the cloud provider. Ensure critical workloads have required anti-affinity away from spot nodes or do not tolerate the spot taint. See: Real Kubernetes Production Debugging Examples
Quick Reference
# Why is pod Pending?
kubectl describe pod <pod-name> -n <namespace>   # read Events section

# Check available node capacity
kubectl describe nodes | grep -A6 "Allocated resources"

# Check node taints
kubectl get nodes -o custom-columns=NAME:.metadata.name,TAINTS:.spec.taints

# Check node labels
kubectl get nodes --show-labels

# Add a taint
kubectl taint nodes <node> key=value:NoSchedule

# Remove a taint
kubectl taint nodes <node> key=value:NoSchedule-

# Label a node
kubectl label nodes <node> node-type=high-memory

# Check HPA status
kubectl get hpa -n <namespace>
Summary
The Kubernetes scheduler places pods on nodes through a two-phase algorithm — filtering out nodes that cannot run the pod, then scoring remaining nodes to find the best fit. You communicate your placement requirements through:
- Node Selector — simple label-based node targeting
- Node Affinity — flexible required or preferred node label matching
- Taints and Tolerations — node-level repulsion with pod-level exceptions
- Pod Affinity / Anti-Affinity — co-location and separation relative to other pods
- Topology Spread Constraints — balanced distribution across zones and nodes
- Priority Classes — precedence when cluster capacity is contested
The most common production mistake is using required anti-affinity without accounting for the node count ceiling it creates. Use preferred anti-affinity combined with topology spread constraints for reliable high-availability distribution that does not block scaling.
Continue learning: