This guide is part of the Kubernetes Guide — a complete topic cluster covering Kubernetes concepts, operations, and production debugging.
Introduction
If you have worked with Docker, you are used to thinking in containers. Kubernetes introduces a new abstraction above the container: the Pod.
A Pod is the smallest deployable unit in Kubernetes. It is not a container — it is a wrapper around one or more containers that share the same network namespace, the same storage volumes, and the same lifecycle. When Kubernetes schedules a workload, it schedules Pods, not individual containers. When a workload fails, Kubernetes restarts Pods, not individual containers.
Understanding Pods deeply — how they are structured, how they start up, how they communicate, and how they fail — is the foundation of everything else in Kubernetes operations. Whether you are writing deployment manifests, designing health checks, or debugging a production incident at 2 AM, you are always reasoning about Pods.
This guide covers the complete picture: Pod architecture, the Pod lifecycle, init containers, probes, resource management, multi-container patterns, and the production considerations that separate working Pods from reliable ones.
Why Pods Exist — The Design Decision
The question most engineers ask when they first encounter Pods is: why not just schedule containers directly?
The answer is co-location. Some applications are made of tightly coupled processes that need to share resources — a web server and a log shipper that reads the same log files, or an application and a sidecar proxy that intercepts its network traffic. Running them in separate containers on potentially different nodes breaks that coupling.
Pods solve this by guaranteeing that a group of containers:
- Always run on the same node
- Share the same network namespace (same IP address, same localhost)
- Can share the same storage volumes
- Start and stop together as a unit
This design is what makes patterns like the sidecar, the ambassador, and the adapter work in Kubernetes.
Pod Architecture
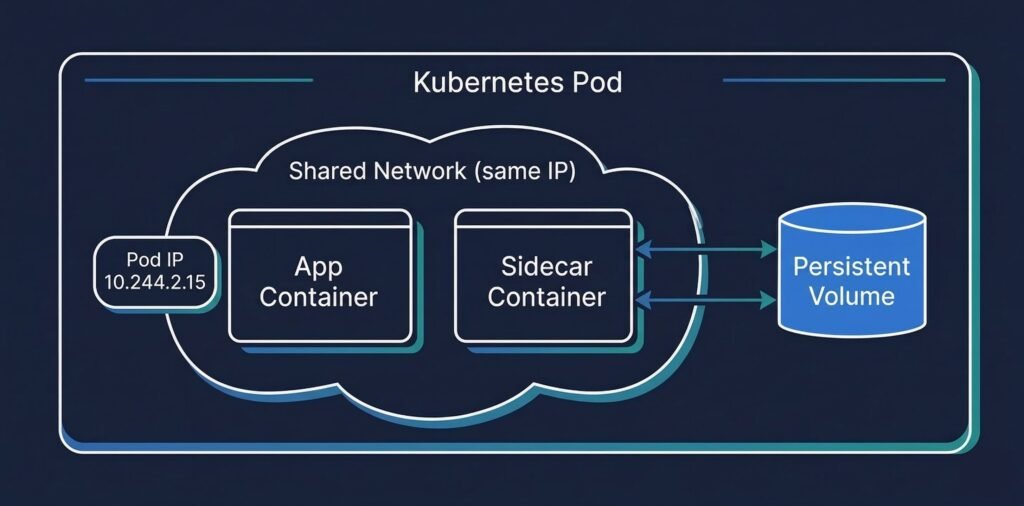
DIAGRAM: Kubernetes Pod architecture — one Pod containing two containers (app container + sidecar), shared network namespace shown as a bubble around both, shared volume shown as a cylinder accessible to both containers, Pod IP visible on the network namespace layer
A Pod has four core components:
Containers — one or more application containers. Each container has its own filesystem, process space, and resource limits. But they share the Pod’s network and can share volumes.
Network namespace — every Pod gets a single IP address. All containers inside the Pod share that IP. Container-to-container communication within a Pod happens over localhost — no Service, no DNS lookup, just localhost:port.
Volumes — storage that can be mounted into one or more containers in the Pod. Unlike a container’s ephemeral filesystem, volumes persist for the lifetime of the Pod (not just the container).
Pod spec — the declaration of desired state: which containers to run, what images to use, what resources to request, what probes to configure, what volumes to mount.
The Pod Lifecycle
Every Pod moves through a defined sequence of phases from creation to termination. Understanding this sequence is essential for writing correct health checks and debugging startup failures.
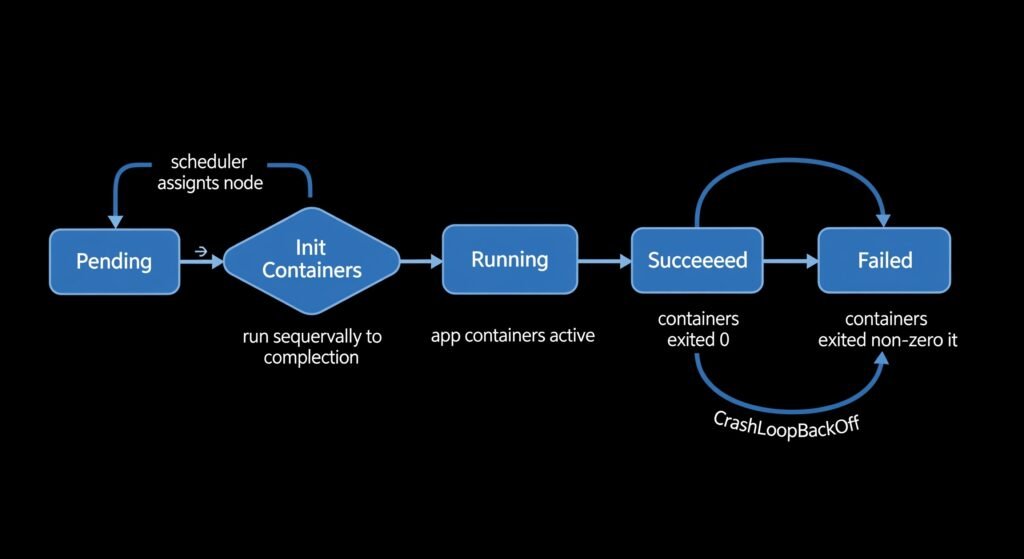
DIAGRAM: Kubernetes Pod lifecycle flow — linear left-to-right showing: Pending → Init Containers → Running → (Succeeded or Failed) with arrows and brief labels at each stage explaining what happens
Pending — the Pod has been accepted by the API server and assigned to a node, but the containers have not started yet. Image pulling happens in this phase.
Init Containers — if the Pod spec defines init containers, they run sequentially here. Each init container must exit 0 before the next one starts. If an init container fails, Kubernetes restarts it (following the Pod’s restart policy). The main application containers do not start until all init containers have completed successfully.
Running — all containers are running. At least one container is still executing. The Pod IP is assigned and the Pod is reachable.
Succeeded — all containers exited with code 0. Common for batch jobs and one-off tasks.
Failed — at least one container exited with a non-zero code, and the restart policy is Never or OnFailure has been exhausted.
CrashLoopBackOff — not an official phase, but a condition. The container keeps crashing and Kubernetes applies exponential backoff between restarts (10s, 20s, 40s, up to 5 minutes). This is always caused by a specific application-level error.
Init Containers
Init containers run before the main application containers and are designed for setup tasks that must complete before the application starts. They are a cleaner pattern than startup scripts baked into the application image.
Common init container use cases:
- Wait for a database or message queue to be ready before the application starts
- Run database migrations before the application connects
- Clone a git repository or download configuration files
- Set up file permissions or generate certificates
spec:
  initContainers:
  - name: wait-for-database
    image: busybox
    command: ['sh', '-c', 'until nc -z postgres-svc 5432; do sleep 2; done']

  - name: run-migrations
    image: myapp:v2.1
    command: ['python', 'manage.py', 'migrate']
    env:
    - name: DATABASE_URL
      valueFrom:
        secretKeyRef:
          name: db-credentials
          key: url

  containers:
  - name: myapp
    image: myapp:v2.1
    ports:
    - containerPort: 8080
In this example, the application container does not start until the database is reachable AND migrations have completed. This eliminates an entire class of startup race conditions.
Liveness, Readiness, and Startup Probes
Probes are how Kubernetes monitors the health of containers after they start. Three types exist, and each serves a different purpose. Misconfiguring them is one of the most common causes of production pod failures.
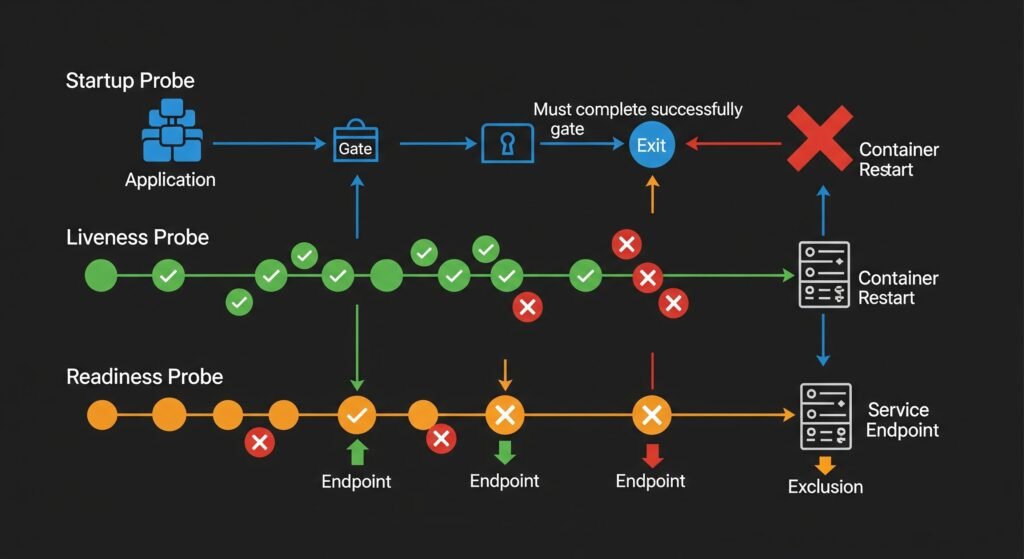
DIAGRAM: Three probe types side by side — Startup Probe (runs first, gate before liveness kicks in), Liveness Probe (runs continuously, kills and restarts on failure), Readiness Probe (runs continuously, removes from Service endpoints on failure but does not restart). Show timeline and what each probe controls.
Startup Probe — runs when the container first starts, before liveness kicks in. Designed for slow-starting applications (Java services, applications running database migrations). The liveness probe does not start until the startup probe succeeds. Without this, a slow-starting application would be killed by liveness before it finishes initializing.
startupProbe:
  httpGet:
    path: /health
    port: 8080
  failureThreshold: 30    # allow up to 30 x periodSeconds = 5 minutes to start
  periodSeconds: 10
Liveness Probe — runs continuously throughout the container’s lifetime. If it fails failureThreshold times in a row, Kubernetes kills the container and restarts it. Use liveness to detect situations where the application is running but stuck — a deadlock, an infinite loop, a hung goroutine.
livenessProbe:
  httpGet:
    path: /ping             # lightweight check — process is alive
    port: 8080
  initialDelaySeconds: 15
  periodSeconds: 20
  failureThreshold: 3
Readiness Probe — runs continuously throughout the container’s lifetime. If it fails, the Pod is removed from the Service’s endpoint list — traffic stops being routed to it — but the container is NOT restarted. Use readiness for dependencies: if the database is temporarily unreachable, the pod becomes unready (no traffic) but keeps running and will become ready again when the database recovers.
readinessProbe:
  httpGet:
    path: /health           # deep check — database, cache, dependencies
    port: 8080
  periodSeconds: 10
  failureThreshold: 2
The critical rule: Liveness probes must never check external dependencies. A liveness probe that calls the database will restart your pods during any database hiccup — turning a temporary database slowdown into cascading pod restarts across your entire deployment.
Resource Requests and Limits
Every production Pod should declare CPU and memory resources. Without them, the scheduler has no information to make placement decisions, and the kubelet has no way to protect the node from runaway processes.
resources:
  requests:
    cpu: "250m"       # 0.25 CPU cores — used for scheduling decisions
    memory: "256Mi"   # 256 MiB — used for scheduling decisions
  limits:
    cpu: "1000m"      # 1 CPU core — throttled if exceeded (not killed)
    memory: "512Mi"   # 512 MiB — OOMKilled if exceeded
Requests tell the scheduler how much capacity to reserve. A node must have this much free to accept the pod.
Limits define the maximum the container can consume. CPU limits cause throttling — the container is slowed down but keeps running. Memory limits cause OOMKill — the kernel kills the process when the limit is exceeded.
The Java gotcha: JVM versions before Java 8u191 do not respect container memory limits. The JVM reads the node’s total memory and sets its heap accordingly — then gets OOMKilled when it exceeds the container limit. Always set -XX:+UseContainerSupport and -XX:MaxRAMPercentage=75.0 in Java container environments.
Multi-Container Pod Patterns
Most Pods run a single container. But Kubernetes supports three established multi-container patterns that are worth knowing.
Sidecar pattern — a helper container that enhances the main container. The sidecar runs alongside the application and adds functionality without modifying the application image.
Pod
├── App Container        (your application)
└── Log Shipper Sidecar  (reads app logs and ships to ELK/Datadog)
Common sidecar examples: Envoy proxy (Istio service mesh), Filebeat log shipper, Vault agent for secret injection.
Ambassador pattern — a proxy container that handles external communication on behalf of the main container. The application talks to localhost, the ambassador handles the external connection.
Pod
├── App Container     (connects to localhost:5432)
└── Ambassador        (proxies localhost:5432 to the real database cluster)
Adapter pattern — a container that transforms the main container’s output to match an expected format. Useful for exposing metrics in a format a monitoring system understands.
Pod
├── App Container   (exposes custom metrics on /stats)
└── Adapter         (transforms /stats to Prometheus format on /metrics)
Pod Networking
Every Pod gets its own IP address from the cluster’s pod CIDR range. This IP is routable within the cluster — any other pod can reach it directly without NAT.
Within a Pod: containers communicate over localhost. No service discovery needed. Container A talks to Container B on localhost:port.
Between Pods: pods communicate using their Pod IP or via a Service (which provides a stable DNS name and load balancing across multiple pods).
Pod IPs are ephemeral. When a Pod is deleted and recreated, it gets a new IP. This is why you should never hardcode Pod IPs in application configuration — always use Service DNS names.
Production Considerations
Always set resource requests and limits. A Pod without memory limits is a cluster reliability risk. One memory leak can exhaust an entire node.
Use readiness probes on every production Pod. Without readiness probes, a new Pod starts receiving traffic immediately after its container starts — before it has finished initializing. This causes errors during rolling deployments.
Set terminationGracePeriodSeconds appropriately. Kubernetes sends SIGTERM to containers before killing them. The default grace period is 30 seconds. If your application needs more time to finish in-flight requests, set a longer period. If it needs less, set a shorter one — do not leave the default blindly.
spec:
  terminationGracePeriodSeconds: 60   # give the app 60 seconds to drain
Use Pod Disruption Budgets for critical workloads. A PDB ensures that a minimum number of replicas remain running during voluntary disruptions like node drains or cluster upgrades.
apiVersion: policy/v1
kind: PodDisruptionBudget
metadata:
  name: api-pdb
spec:
  minAvailable: 2
  selector:
    matchLabels:
      app: api-service
Common Mistakes
Setting initialDelaySeconds too short on liveness probes. If your application takes 30 seconds to start but initialDelaySeconds is 10, Kubernetes kills it before it finishes initializing — causing CrashLoopBackOff on a perfectly healthy application.
Using required pod anti-affinity with too many replicas. If you set required anti-affinity (one pod per node) and try to scale to more replicas than you have nodes, the extra pods are permanently unschedulable.
Not setting a restartPolicy on batch jobs. For one-off jobs, use restartPolicy: Never or restartPolicy: OnFailure. The default Always will restart a successfully completed job indefinitely.
Forgetting that Pod IPs change. Any configuration that hardcodes a Pod IP will break the next time that Pod is rescheduled. Always use Service DNS names.
When Things Go Wrong
Pod is stuck in Pending — the scheduler cannot find a node. Check resource requests, node taints, and affinity rules. See: Debugging Kubernetes Scheduling Problems
Pod is in CrashLoopBackOff — the container keeps crashing. Check exit codes and previous container logs. See: How to Debug CrashLoopBackOff in Kubernetes
Pod is Running but not receiving traffic — readiness probe is failing. Check the readiness probe endpoint and its dependencies. See: Production Kubernetes Debugging Handbook
Pod is OOMKilled — container exceeded its memory limit. Increase the limit or fix the memory leak. See: How to Debug CrashLoopBackOff in Kubernetes
Quick Reference
# Minimal production Pod spec
apiVersion: v1
kind: Pod
metadata:
  name: my-app
  namespace: production
  labels:
    app: my-app
spec:
  terminationGracePeriodSeconds: 60

  initContainers:
  - name: wait-for-db
    image: busybox
    command: ['sh', '-c', 'until nc -z db-svc 5432; do sleep 2; done']

  containers:
  - name: my-app
    image: myapp:v2.1
    ports:
    - containerPort: 8080

    resources:
      requests:
        cpu: "250m"
        memory: "256Mi"
      limits:
        cpu: "1000m"
        memory: "512Mi"

    startupProbe:
      httpGet:
        path: /ping
        port: 8080
      failureThreshold: 30
      periodSeconds: 10

    livenessProbe:
      httpGet:
        path: /ping
        port: 8080
      initialDelaySeconds: 15
      periodSeconds: 20
      failureThreshold: 3

    readinessProbe:
      httpGet:
        path: /health
        port: 8080
      periodSeconds: 10
      failureThreshold: 2
Summary
Pods are the foundation of everything in Kubernetes. The key principles:
- A Pod is a group of co-located containers sharing network and storage
- Pods go through a defined lifecycle: Pending → Init → Running → Succeeded/Failed
- Init containers handle setup tasks before the main application starts
- Liveness probes restart stuck containers — never check external dependencies in them
- Readiness probes control traffic routing — use them for dependency health checks
- Always set resource requests and limits in production
Continue learning: